Previously I wrote about removing color in fabric with bleach and why you shouldn't. Now here's a little helpful post using color remover in a safer way, however caution should still be used, as I'll describe.
Now there are a few ways that you'll find "color remover" or "decolorant," however it's basically going to be a mix made from Sodium Hydrosulfite (Hydro) or Thiourea Dioxide (Thiox). Both chemicals are the same you would use to make up a vat of indigo, acting as the reducing agent.
Jacquard makes a single packet you can try out on a small scale and a bottle that will anti-dye about 1/2lb of fabric, with all instructions on packaging. I'm going to show you how to use the bulk materials using both Thiox and Hydro.
The recipes for both Thiox and Hydro for 1 pound of fabric to weight are the same, but the physical amounts are different because Thiox is much heavier. You add 3-5% of Thiox or Hydro to WOF (weight of fiber) and add the same amount of soda ash. So simpler:
For 1lb of natural fabric, add 10 grams of Thiox/Hydro and 10 grams of soda ash. Which is about 2.5 tsp Thiox and 2 tablespoon Soda Ash but 2 tablespoon Hydro and 2 Soda Ash Soda Ash. Now these proportions are pretty loose, and adding slightly more can remove a bit more color, so experimentation is welcome. However be aware that sometimes the color Will Not remove. I depends on what dye the piece was originally dyed with. The same color may look differently item to item, as you'll see in the lonely tank top that I anti-dyed here.
Adding a little glycerin or synthrapol to your Hydro based dye pot, say a 1/2 tsp, I have seen suggested and attempted myself a couple of times, but I really don't think it's necessary when using in shibori or tie dye techniques. It would be more helpful when removing all the color as it helps to smooth everything out.
Have white vinegar on hand. You'll need a neutralizing bath for washing, but good to have pre-made just in case.

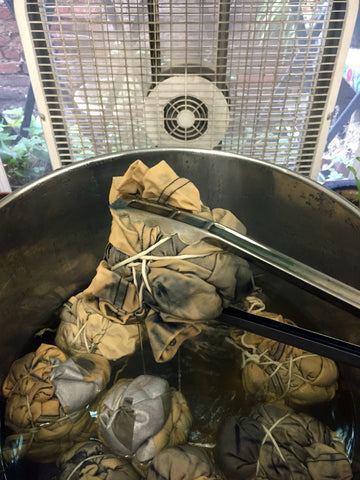
1. Weight your fabric. I've simply bound these black tshirts that have been sitting in my sale bin to give them a new look. All I did was bunch each one in my hands and then wrapped them with cotton cord. Don't use rubberbands, because you'll be heating the pot up and they might break.
2. Soak in water after you've bundled and then wring out as much liquid as you can. These bundled Ts require at least 20-30min but I probably left overnight.
3. You'll need a non-reactive pot, ie stainless steel or ceramic coated, and good heating source because you do want your water to come to a boil. Set up your dye bath by a window with a fan pulling the fumes outward. Hydro and Thiox are sulfur based and should be used with caution. When you heat it up even more cation should be used, especially if you are a person with respiratory issues. If you do, maybe set this up outside, or wear a good mask while your are working over the pot.
4. Wait until your water temperature has reached at least 170 degrees, add your remover, soda ash and glycerin (optional). Help it out dissolving and give it a stir. Then add your saturated fiber.
5. Ideally there wouldn't be air inside each bundle...but that's asking against science and nature. When the pieces are floating out and into the air, it's not able remove color evenly (see above). Now maybe with other dye pots you would still at it and stir, but I really don't recommend having your face over the pot too long.
This is a solution I rigged up. I took a small cooling rack and weighed, only slightly, with to small pieces of marble. The trick is to weigh it under the surface without the fabric hitting the heat source at the bottom where is it risks scorching the fabric. You can certainly wait and flip each piece ;-)
6. Keep at 170-185 degrees for about 15-20 minutes. If you see that not enough color has been taken away, you may add more color remover mixture. You can do this a few times. But make sure you remove your items from the dye pot, add the mix, stir, then return items to the dye pot.
Sometimes you may not be able to tell at first that the color is removed! I thought that this one piece was a bust and was gearing up for a minor disappointment. However once I washed them, I saw the difference it made. Hooray!
Now wash up! Remove the items and wait for them to cool. Trust me. You don't want to unwrap before you've cooled them, as they stay Hot inside.
I will rinse the pieces in cold water while they are still bundled up, wring out, then unwrap.
Now even though it is usually only suggested that you neutralize wool and silk after anti-dyeing, I do this with all items. Dip and soak all your pieces in water and vinegar solution. About 1/4 cup of white vinegar per gallon. A few glug glugs in a bucket of water will do.
Then final wash should be in a
synthrapol to get all the dye that is sitting in the fiber still. As is my typical, I do hot water soapy wash then a cold water rinse.
And there you go! No gross bleachy smell, no lost brain cells. And since this works at high temperature there's not continued color removal once you done you have to worry about Or fiber breakdown!


Re: Alana; I only know to add some vinegar to the “dye” water before putting through the drain.
how do you properly dispose of the water?
how do you properly dispose of the water?
Amber, do Not use on your hair! My posts are all about fabric. Go to a professional!
This is Not a mordant at all. It only removes the color. To dye further you need to do all the steps depending on what dye you use.