At Long Last, SNOW DYEING!
Snow dyeing is a fun way to spend a snow day! It can also be done with ice cubes, but I don't like to waste the cubes, and would rather take advantage of the fresh clean snow nature has left for me. So when the opportunity arises (here in NYC it's rarity) I take it!
This process will only work on cellulose fibers (cotton, hemp, linen, some rayons), as reactive dyes on silk and wool require heat. (Though if you want to try on silk and switch soda ash for citric acid, do so! Let me know how it goes!) Blends will work but the tone will be much much lighter as it will only be bonding the natural fiber in the blend.
Yeah! Snow Day!

Step 1, Wash your fabric. Essential, especially with heavier weight fabrics. You can leave it damp but wring out as much liquid as you can. If you're prepping ahead of time, and your fabric is dry, it can go into the soda ash that way, but leave soaking a bit longer so it has time to saturate.

Soak in soda ash. Now you always need to "activate" reactive dyes, but with each process you choose before, during, or after. I have gotten into doing it before hand, however I'll add at the end of this a few other options top play around with. The results will be slightly different for each variation.

Mix up a Soda Ash Soak Solution of 1 cup per gallon of warm water. The more items you need to soak, the more water you'll need. I also, for this particular process, will add more soda ash, say an extra cup. Soak fabric 10 minutes minimum with occasional stirring. Thicker fabrics will require longer than sheer. If I know I will have fresh snow in the morning, I will soak my fabric over night. Basically when the forecast says they're will be a snow dump, I start soaking.
While wearing rubber gloves, wring out the fabric well and do not rinse. (This Soak Solution keeps for a long time at room temperature in a closed container and can be reused to soak more fabric. So don't throw away. You'll probably want to dye again when you see the results!)

Set up a dye area where you can lay your fabric above and collect the dye that drips below. I have seen other dyers placing items in a bucket, fabric/snow/dye. I find without having a space below to catch the dye and keep it separate from the fiber, the pieces get very muddy looking.
But like I said before, every variation yields different results. Find the way that works for you!
I put these old shelving racks over tupperware so I can do a handful of pieces at a time. Other examples might be a cooling rack over a bin or placing a couple of bricks in your bucket. Anything that will raise the fabric off the bottom.

Lay out your fabric so it's not folded on itself and as even as you can make it, so the color ends up evenly dispersed.

Gather and get ready! Once you grab the snow times ticking. You should have gloves (both warm and rubber) and mask on. Never work with these dyes without a mask on. As stated in previous post, breathing in these powders can cause respiratory issues. Especially the way I'm showing you how to do this.

Gather a good amount of clean (enough) snow! Having the warm gloves will help here and later.
Pick 2-3 colors of fiber reactive dyes, being aware of the color chart. Choosing more than that I find is over kill, and often results in just brown, but to each there own.
Also be aware that some colors are less saturated and vibrant than others, and don't work as well at lower temperatures. For instance black does better when you raise the temperature, so often you'll just get grey here. Ice blue is very light and will be over powered by other colors. Then all these colors are basically mixtures of base colors, so you will see particles of many colors with this method I'm showing you.

Now I add the color right to the fabric. (I'll mention other options at the end) It is very very easy to go overboard here and be left with a mess. I use paint brushes to grab a tiny bit of powder and tap it over the piece. A little goes a long way, and I can not stress enough how important it is to wear a mask.

You'll now pile the snow up!

Pack it on carefully, sensing the way it will melt and fall so you don't waste any.

The speed of the snow melting matters. My studio is pretty cold, which means it takes a little longer to melt. I feel pretty lucky that the snow will last the day or overnight. Too quickly and the colors don't blend enough. It needs a minimum of 1 hour to activate and often the colors aren't as vibrant. There's also issue if they don't melt at all. This dye once activated by the soda ash is limited to working for 24 hours only. If working outside, make sure it's warm enough for the snow to actually melt :-). Experiment with all this in mind.


Once melted. It will look unimpressive. Don't worry!

Rinse lightly in cold water carefully. I rinse the three color themes separately. But if your soda ash ratio was proper, you really shouldn't see much bleeding.

Then wash in hot bath of synthrapol. This special washing agent isolates dye particles are further reduces any bleeding and color running you may see.
A soak in fiber fix solution, also called retayne, is very helpful and reduces washing/water used.
Then a final rinse.


Then end results are so satisfying! Even when dry the colors really explode!
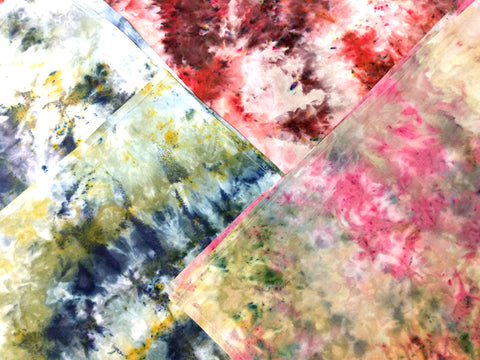
Now to PRINT!
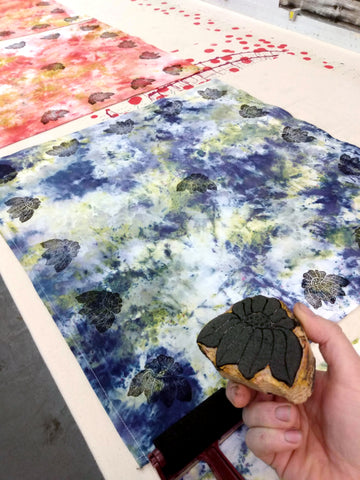
I chose to print my coneflower block on these guys. Check them out!

Some other options with adding color:
Add the snow atop the fabric, then the color to the snow. Either wetted or dry powder.
Add the color and soda ash powder atop the fabric, then the snow. Using ice cubes works a little better for this option.
Add as I write in the post and also add dye to the snow. I would add much less powder atop the fabric.
Every dyer finds the way that works best for them, it will all look differently. All just as good.