Naturally Dyeing Grey to Black
Achieving the desired grey and more elusive black can be tricky. It really has nothing to do with your wants, and everything to do with your materials. The natural fiber you're trying to dye, the type of tannin your base color is, the type and amount of iron using to modify the color, and time are all factors you have to carefully monitor and balance to get the tone you're looking for.

I scored this sumac during a bike ride in the fall here in NYC, and used within a few weeks. I put in the freezer to preserve but also to put to rest some of the bugs I didn't see. (I have had a spider problem before after collecting these guys.) You can also let dry and use later, but I find it's always best fresh. Sumac has about 15-20% tannin levels and you use the whole shrub/tree, but go for leaves and twigs spring/summer and the lovely berries in fall which will leave tiny bursts of red in bundle dyeing if you watch your temperature. A general rule for collecting is never take more than 30% of a plant so that it can recover. I'll take a bunch from a few trees to spread out the take. Some other fall tannin heavy goodies are acorns and black walnut husks. At the end of this post are samples of dyes I sell that you can use as well.

For this project, I am using 50% weight of sumac to the fabric I have, which is a bamboo viscose. So that's 50% WOF (weight of fiber), 1lb sumac, 2lbs fabric. The greater the percentage of dye material, the deeper the color. I am very much a "get what I get" dyer, but if you are looking for a specific tone, you will need to sample as one will get different tones on different fibers and using different tannin based dye stuffs. As long as your WOF percentage remains consistent you should be able to replicate, though there will be variations working with natural dye materials. To be the most consistent, maybe stick to dye stuff you can purchase rather than forage.

So get that dye material in a "non reactive pot," ie. stainless steal or ceramic coated. You will need pots designated for dyeing. It's not a good idea to use your cooking pots for this. (Since we're making our base dye first without any metal minerals, it will be okay use one from your kitchen, but Not the second step.) Fill with water. If you have hard water, you may want to use rain water or distilled water or "soften" with some calgon.

Simmer materials for at least an hour, never letting boil. I use electric burners so it never gets hot enough to boil. Boiling can spoil colors, which is not really an issue in this process, but a good habit to get into.
After that first simmer session, you're going to transfer the dye bath to a larger pot that's big enough for my fabric to get into and flow around. This MUST be a dye only stainless steal pot. Using a pieces of mesh, layered cheese clothe, or even a cut up old tshirt, strain out your sumac and return to the smaller pot.
I will then repeat the process and let the dye pot still over night. When using heavy materials like sumac/acorns/bark it can take some time to get all the useful color out. While you wait, start prepping the fabric you'll dye. It should scoured and then soaked in water. So if you scour the same day, just leave it wet. If it's been washed days ago, soak overnight, and wring out in the morning. No need to mordant, but you can if you would like.

The next day, filtered the rest of the dye bath into your larger pot and bring back to temperature. You're going to add your damp fabric. Make sure the pot is full, but won't over flow when you add the fabric. You may need to add more water, or take some dye bath out just to make sure it won't over spill. You can always add back once the fiber is in the pot.
The textile need to be fully saturate in warm water (cold will cool the dye bath). With a small piece of think fabric that could be 15min, for thicker fabric sometimes it's best if you leave overnight. When soaking thin fabric, but many yards, I'll soak for an hour at least. It's okay if you've soaked overnight and the fabric is cold, it will just take a bit to heat the bath with fabric in it. When you're adding warm fabric, there's just less time wasted heating the dye bath back up.
From the water, you want to wring out as much liquid as possible. You want the fabric to soak up the dye as your adding it to the pot. It's can't do that if it's dripping wet.
(Sorry there's a void of pictures for this part of the process. Imagine white fabric being added to large pot full of dye :-) )
Once the fabric is added I keep over medium heat, stirring every 10-15 minutes for at least an hour. Longer doesn't hurt, but you want to for at least that hour. You can then turn off the heat and sit in the warm bath overnight. I'll come check on it and stir when I can, and if it's winter I'll wrap the dye pot in a blanket. (Make sure the burners not hot still! You don't want to risk burning your blanket.)

The next day...The fabric is removed from the dye pot, but DON'T POUR OUT THE DYE BATH. Keep that dye bath for the next step, bring it back to about 150-180 degrees. Make sure the fabric is cool and wring out the dye but don't wash it. The fabric is more manageable when wrung out. The Sumac dyed bamboo viscose a lovely peachy tone. Every fabric will take a different tone, even one cotton being different than the next. You can just keep this color if you'd like! But since we didn't prep the fabric with a mordant, the color's not as vibrant as it could be, and will fade a bit with time an UV exposure.
I didn't plan on needing a pre-mordant because the plan was to make grey! Which requires ferrous sulfate and in itself is a mordant. So Next Step!

Iron is a metal mineral that is used in health and lawn care, and natural dye process! When used in very low percentage (ie 2% WOF) it can "sadden" colors or sometimes create green like with rosemary and onion skins for example. When combined with dye stuff containing tannins (tannic acid) you will achieve grey to black depending on the level of tannin in the material, the percentage of iron you add, and the time you are leaving the fabric in the dye pot.
You can use iron "store bought" which is easier to measure, by making "iron juice" from rusted objects water and vinegar, or putting rusty objects straight in your dye pot.

Find full blog on iron here. For this demo I added a glug from the iron juice and 3 Tbl ferrous sulfate powder. The iron juice will have bit of rust that will leave marks (pour through mesh/cheese clothe to eliminate) that I like, while the powder is a concentrated bust of power. Add 2-4% WOF to start and know that more than that can damage the fabric. Wool for sure will become brittle and break and is generally not recommended with this process, so start even lower.

So have your fabric on standby and add your iron to your pot of dye color, no higher than 170 degrees.

Add "wetted out" fiber as carefully as you can. This color will get on Everything, so try not to splash. The trick is to get the fabric into the pot, without it being folded or bunched on itself, as quickly as you can so the color is even. This is about 5 yards, so fairly trick. Start with smaller pieces when getting into the process on your own. I have tongs in one hand. I let the fabric fall in from the one hand high, and push down the fabric with the tongs in the other hand. See how the color changes Immediately in pic above! The color will darken with time. Stir every 15 minutes for an hour and then put to bed. Take from heat and let sit until the end of day or the next day. If you feel it's not getting dark enough, remove the fabric, add a bit more iron, then add the fabric back into the pot. NEVER add iron when the fabric is in the pot already. You'll be very disappointed.

As the fabric sits in the pot between stirring, watch for air pockets that lift fabric to surface. Bubbles will leave circle iron marks, which you may not mind...

Use the tongs to keep fabric under surface, without pushing the fabric to the bottom of the pot. Touching the bottom will pick up iron sediment, but can also burn the fiber if the heat is still on.

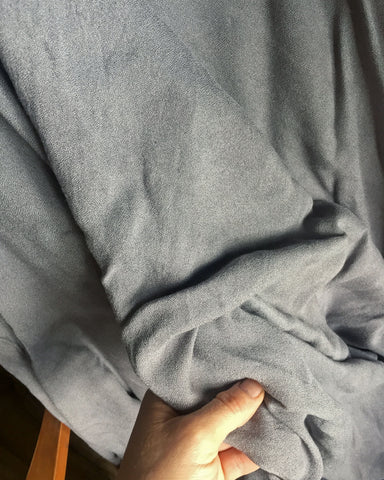
The iron will make the color darker with time. Above pic is at 15 minutes

One Hour

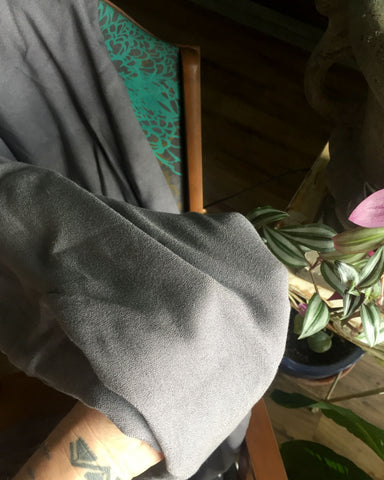
Above pic is the color at the end of the day. I still let it sit overnight, but I knew this would be as dark as the fabric would get. There is a limit to how dark your fabric will get. If you didn't use the correct or enough tannin, you won't get that fabric to black. You can definitely over do it with iron and cause the fabric to break down. So don't assume you can just keep adding iron to get it as dark as possible. Accept the lovely color for what it is.
Knowing the color will wash lighter and it looks darker when it's wet, when your satisfied with the color, carefully remove fiber and wash. I will quickly rinse and wring out, then hot Hot water wash with sythrapol, and give a final Cold water wash. That's my washing rhythm.

MYROBALAN is my favorite dye to get greys to black on cellulose fabrics.

CUTCH a second best.

MARIGOLDS with iron in minor amounts will produce lovely olive green.

MADDER doesn't get you grey or black, but a lovely dark maroon shade ca be achieved with a tiny bit of iron.